Saturday, February 26, 2011

Cards for the Troops

This Monday I am doing a "Cards for the Troops" class for another Brownie Troop.  As you may know, I am also the leader of Ally's Brownie Troop. It's honestly one of the volunteer activities that I do that I love the most...it takes ALOT of time and A LOT of planning, but I get just as much out of it as I put into it! 

Here are the cards we'll be creating ...

 
The girls will be making four cards...three to give and one to keep. Can you guess which one I've made them to keep? Yep, the pink, girly one! Perfect for them to give as a Teacher gift, Mother's Day Card or just to send to their latest BFF.  And the Sock Monkey card? The girls will  be able to choose what they want their monkey to hold...a heart, pennant, banana, balloon, cupcake...or whichever they choose. I think they'll like being able to customize their own cards.  This class would also be great to make that stash of Thank You cards that a troop seems to need throughout the year! 

I'm also working on a special class for Brownie & Daisy Troops using this stamp set called "Under the Stars":

 How perfect is this! Think campfire, smores, sleeping bags...all the stuff that reminds me of Girl Scout Camp when I was young! 

I have a bunch of other class offerings available for Girl Scout Troops, if you're interested, please contact me...I'd be happy to send you all the details!

RaeAnn

Tuesday, February 22, 2011

HodgePodge Happiness

Wanna get Happy with HodgePodge?

The HodgePodge Happiness Kit is $55 + Shipping and Tax and includes:
That's a savings of over $25.80!!

The great part is....you'll have LOTS of Hardware, Paper & Dimensionals left over to create OTHER fantastic papercrafting projects!

Note: The instruction cards use other stamp sets, ink pads, a paper flower and a rhinestone that are not included. You can use things you have already that will work, or, you can place an order with me for additional supplies and receive further FREE Sale-A-Bration product.

OR 
 
How about the "Hint of HodgePodge" Offer...

For those of you who don't want the full kit, I have another offer! Anyone who purchases either the Styled Silver or Styled Vanilla Hodgepodge Hardware Kit during February or March will receive the PDF Instruction File of these designs for FREE!!

Here's a Sneak Peek at what the Get Happy with Hodgepodge Instruction Booklet contains!
(If you were at my last Taste of Stamping Workshop...you saw all these great cards up close!)


To order either the Hodgepodge Happiness Kit or to place an order to get the Hint of Hodgepodge offer, please email me at raeannskerrett@hotmail.com

Happy Stampin'!

Workshop Yummies & Card

Edit:  Unfortunately, I am going to have to cancel the HodgePodge Happiness Class for this Sunday as some unexpected family obligations have come up...I will be offering a KIT option if you would still like to make these fantastic cards! Please let me know if you have any questions!

Well, it's February Break here in the Skerrett household!  We started break off by taking the kids to Toronto and visiting the Ontario Science Center (LOVED it!) and now we've got a couple of birthday parties and some other low key stuff to do until school resumes next week! 

Before we went away, I held one of my "Taste of Stamping" workshops.  This is a great way to introduce yourself or your friends to the sport of stamping!  We had a great time, but I think one of the highlights were these...
I found this great recipe here.  These cookies are called "Double White Chocolate and Pretzel Peanut Butter Cookies with Sea Salt" (Yes, it's a mouthful...but a YUMMY mouthful!)  This has to be my new favorite food blog of all time! Delicious food, simple recipes and a fun site to check out daily! I hope you enjoy it too!

Now, to get back to the stamping...  Here is a sample of one of the cards we created.  What I love about having a "stash" of cards around is that you can just run to your pile and pick one out that fits whatever occasion you need one for! Today, that occasion was an ice skating birthday party that Ally was invited too.
Notice that my little creation is NOT hiding in an envelope?? Go ahead, show off your cards on the OUTSIDE of your gift packaging...it makes your gift look fabulous and gets some ooh and ahhs along the way (and if I'm being honest...it saves you an envelope!)

If you look on my calendar, I actually have a class planned for THIS Sunday! I am working on those samples right now and will have details posted soon to times and cost. I hope to stamp with you soon!

Wednesday, February 16, 2011

Wednesday Morning Eye Candy...

Check out this video from Shelli Gardner (she's the Stampin' UP! CEO/Grand Poobah)  I could watch this video over & over again...I love all the beautiful room ideas, decorations, organization....Heaven!!


What did you love? 
Leave me a comment of things you saw in this video that you couldn't take your eyes off of...


Tuesday, February 15, 2011

Introducing...Simply Adorned Necklace Class!

Beside all the cards I create, I also like "the stuff". I was over the moon when Stampin' Up! came up with the Simply Adorned line of jewelry chains, bracelets and accessories.  So, I am very pleased to share with you my NEW Simply Adorned Class that is scheduled in March....
Stampin' Up! packages the necklace (and bracelets) in very nice brown paper boxes...we'll be decorating the box to make it an extra special gift...or to use as a storage box for your other charm inserts!  Notice the stamps that were used?  Yep, that is the Punch Potpurri set that you can earn from hostessing a workshop!

Here is the piece de resistance...


Love it? I do...and I hope you can come create one for yourself! Check out my website event page to get more details on date, time and all the other important stuff!

Who says stamping just has to be JUST cards?


Saturday, February 12, 2011

Valentines-Day Two

For Jack's Valentines I wanted to do something different...frilly and girly, of course, were out. I also wanted something quick and easy because I still need to work on my teacher's gifts. 

So, here is what a simple stamp and a punch can do...

Kindergartner's like "stuff" and they really seem to like pencils...maybe it's because they are loving the fact that they are learning to read and write (at least I know Jack is!). I made a little Valentine bouquet of sorts. These paper doilies are everywhere this time of year and make every project feel extra special!  I took my standard hole punch and punched one hole  near the top and one near the bottom of the doily and simply inserted my Dollar Store pencils inside.


Then, just by adding a couple of sentiments from the Oval All stamp set and punching them out with the Scallop Oval XL punch....wa la!  Instant valentine...not too girly, but still gets the message across!

Now, to offer you a chance to get your PUNCH ON, here's a little give-away! 

Go to my Stampin' Up! Online Store or come to one of my classes or workshops in February or March and purchase either the Designer Label Punch and/or the Round Tab XL punch and get entered into a draw to win the Party Punch Stamp Set which coordinates perfectly:


Just send me your order number if you order online and you'll be entered!

Good Luck!


Friday, February 11, 2011

Valentines-Day One

Remember those fun flower barrettes I was making for Elizabeth's dance class...we'll ladies (and gentleman ?)...here is the finished product:


I simply used a Stampin' Up! Medium Cello Bag to fill with a few items to make this darling little gift sack.  I first lined the back using the Springtime Vintage Designer Paper and slid in my little barrette, a small chocolate heart and a Valentine's chap stick. 

Here's a little more of a close up.  I used the coordinating decorative paper at the top of the bag with the eyelet border punch and some champagne glass glitter to make it all sparkly and pretty.  I stapled the little bag topper on, but to give it a little more character, I added a clothespin covered with the Pear Pizazz 1/2" stitched ribbon and some buttons. I LOVE clothespins to add a little dimension and a whole lot of "cute factor" to packagings and cards!

Sometimes it's the packaging that really makes a small (and inexpensive) gift special!

Now, one to Allison's Valentines.  Since Tea Staining the fabric the other day...I wanted to do MORE. So, I did a little online searching on Paper Tea Staining

Wait until you see this!

Unlike the Fabric Tea Staining, where you put the fabric INTO the steeped water....with the paper staining you just use the tea bags to do the work.  So, I made myself a big cuppa tea with three tea bags and let them steep for about 10 minutes or so...


Take the tea bags out and squeeze out a lot of the excess tea...you don't want to soak your paper.  I squeezed the bag until damp and then blotted the paper.  I chose a decorative paper with a light background that would really show the aging well.


You will need to let them dry completely before you start adhereing them to your project.  Remember, it's paper and water...the paper is going to curl...IT'S OKAY. It just adds to that aged, well loved look!

Here is the before and after...
Are you loving this as much as I do??? It just gives you a whole other directions to go with your  papers!  I am on a Tea Staining rampage! I just LOVE the look!

The tea stained element was the basis for Ally's valentines this year..I went cute and vintagey. I had to make 21 of these for her class.  I really like making the 3x3 cards...quicker...and cute to boot!  Another "go to" item I used was Kraft Cardstock (Crumb Cake would be perfect too!). It's the perfect fit if your not sure where you're going to take a card (like when I started with this). It looks great with almost anything you put with it. Here I stamped the kraft cardstock with the largest stamp in the Fresh Cuts set in whisper white craft ink, added my tea stained element and then adhered a Springtime Vintage fabric heart (more on that in a minute) and I tied off a button with linen thread. Done.

The inside? 

Simple stamping with room for Ally to write that special someone's name and her signature.

Now, do I think that any 8 year old is going to appreciate this handmade valentine? Probably not. But I know that Allison loves that I made them...and maybe some Mom out there will go through her child's valentine bag when they get home from school and will smile when she's see's it... 

BUT,  just to make sure the kids like it a little bit...I am using my two-way glue pen to add a little Valentine eraser to the inside! Sometimes, it's the small things...

Well friends, Elizabeth's Valentines have been distributed at dance class, Ally's are ready to go...now I need to excuse myself and get creative for Jack's class...I can't wait to share what turn out to be!

Wednesday, February 9, 2011

Odds & Ends

I found more pictures from Stampfest that I thought I would share. It truly is amazing how you can take one product line, stamp set or color combination and do so many cool, unique and completely different things. 
This card was on a sample board with items using the Take a Spin Stamp Set and the Game Spinner Hands that are in the Occasions Mini. You can't see it too great here, but the whole set makes these fun and interactive spinner cards for all occasions.  You know what else is really cool? Stampin' Up also has the matching 2 1/2in circle punch to punch out those Spinner circles...easy peasy!
What's so great about the Spinner Hands is how versatile they are...they can be used alone (like here) or with the stamp set. So cute. I also love this Eat Chocolate stamp set...those of you having workshops with me in the next month will be seeing this again!

Here is a little paper box that uses the spinner hand "stretched out" to run a Cupid's arrow through the heart (want to know the trick on how to stretch is out?  Just snip it in half and adhere!)

Lastly, I keep gravitating back to that Oh Sew Suite line..I can't get enough of that sewing and notions theme!


Don't you love looking at all these samples? I do, and I can't take credit for any of them folks...these were put together by some super talented and creative people on our team of stampers!  That said...now that I just got THIS delivered...
You will be seeing more and more and more and more and...you get the picture.  

I am looking forward to tomorrow. Mom is coming over to hang out with the little ones so I can get my creative juices flowing. On the agenda? Valentines. And lots of them... 

Monday, February 7, 2011

Fabric Tea Dying

Have I mentioned that I am in LOVE with the new Springtime Vintage Fabric & the Fun Flowers Die for the Big Shot?  I knew I wanted to make something special for my 2 year old's Dance Class for Valentine's Day...so I decided to make the girls little flower hair barettes...
I love the soft florals and shabby chic-eness of this fabric, so I thought it would be a perfect candidate to try some Tea Staining! What I love about tea staining, is that it is a cheap n' easy technique...the best kind!  It's definately not brain surgery, but I've put together a little step-by-step tutorial for you today..
First, get a pot of water boiling so you can make your tea...that kettle in the background probably would have worked too! (duh)
The research I did said to use two tea bags for white or off white fabric...since we have some florals and some color going on with these prints, I decided to turn it up a notch and do three (I know, I'm a rebel)

Pour your boiling water into your bowl of tea bags and let steep for about 10 minutes...longer if you want it darker. You can see from my pic above that it ended up being a rich, medium brown color. (note: I took OUT the bags before putting in my fabric...I've read that you can leave them in--put them on top of the fabric--which will create a more varigated look to the staining)

Let your fabric and tea sit for another 10 minutes or so...

Pull out your fabric and put it in a colander in the sink to drainit. Then, you can either throw your fabric in the dryer....
..or leave them to hang dry in your kitchen like I did!


Next, put your DRY fabic on your die and Big Shot away! The dies fit quite nicely on the fabric, just by cutting on the fold lines that the fabric has from being in the box it comes in! The piece above is 7 in x 18 in and can fit the die twice. Run it through your Big Shot...

And you'll wind up with is a bunch of pretty die cut flowers. Lay them out and give them a quick spray of Spray Starch.

This is what I used (got it at Wegmans)

Now here's the fun part...crumple the paper (flowers and all) into a tight ball. Really mash it together...it will give your fabric a nice worn, crinkley, aged look!

Lay out your flowers one more time to have them dry completely.

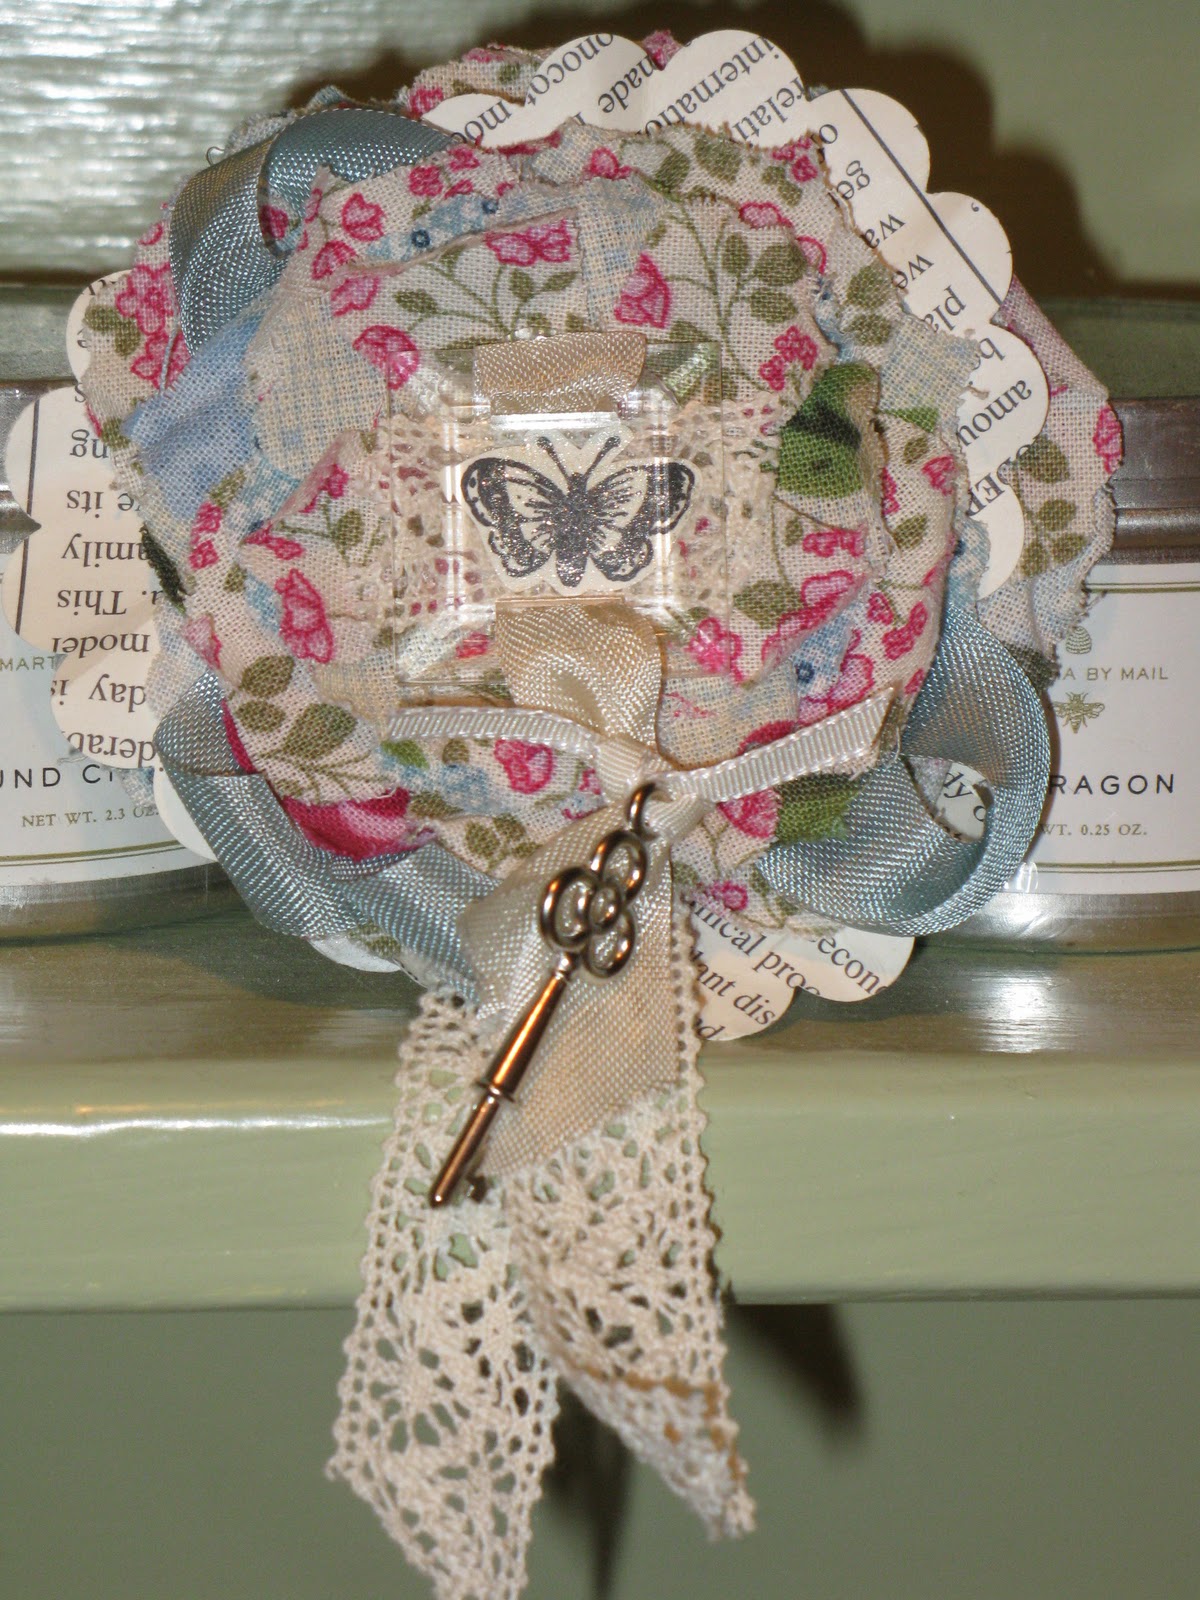
All you do next is layer each petal (I worked largest to smallest) and put a dab of hot glue between each layer. It's amazing the color variations you can get using the same fabric, just by the way you "stack" your flowers.  Here's the finished product..

The one on the left was tea stained and the one on the right was not. Makes a difference, huh? I think I actually prefer the tea stained one. Oh, I guess I should mention that I also hot glued a hair clip (from my local craft store) underneith each one. Let me show you how it looks when you wear on...
Meet Elizabeth, Dancer & "Hair Model"


You can see in this picture that I added a Springtime Vingtage Big Button and a little Vanilla Seam Binding to make it even more girly.


And, of course, I couldn't stop there..

I also picked up a steely grey colored satin headband at the craft store (with a coupon, it was less than $2.00) and put a flower on that too...


And here we go...

I think I will be making many more of these in the near future...so easy and fun! Wait until you see how I package these up for my little dancers for Valentine's Day...


More from Stampfest

I know the last post had a lot of "stuff" so I thought this time you might like to see some of the cards we made...
Here's a cute notepad holder (or you can fill it with cards, pictures, whatever you fancy!) It was created using the Clear Mount Stamp Cases that are in the Idea Book & Catalog.  Super easy, super quick and super cute. Pretty much all we did was use the decorative paper from the Botanical Gazette line (vintage-y and very pretty) and along with the Top Note die, Decorative Label Punch & XL Oval Punch...we were on our way.  Add on some pretty ribbon and a key trinket and we're done! Punches are such a quick and easy way to really put a project together, don't you think?  Another thing I really like about this project is the stamp set we used...Clearly For You. This is on it's way to me now via my last order...I can't wait to get my hands and play some more! 

Oh, I said that I was going to show you cards, didn't I....oops
Gorgeous, isn't it?  See that small clear square in the bottom left hand of the card? That's one of the Beveled Windowpanes from the Occasions Mini Catalog. Did you pass right by these while you were looking through that Mini? I did!  Now I am in LOVE with the results and can't wait to work with them more...


How pretty...love the colors.  And how about this...

I just love the way the images really pop with the beveled glass over them...it makes the card just that more special, doesn't it?  What's nice is that the windowpanes have slide holes on both sides so you can easily slide the ribbon through...

Hmmm...I think I feel a Beveled Windowpane class in our future...what do you think?


I'm going to leave you with this one for today....it's a brooch make from the Fun Flowers die, Springtime Vintage Fabric and those darling little key trinkets.  Can you see the mini windowpane over the butterfly? Love the vintage look and feel. You can wear it as a pin, maybe make one up for that person of honor at the bridal or baby shower...or how 'bout leaving off the pin and attaching to a wedding, shower or birthday gift.  I know I would love to see what's inside a package if this was on top!  And you know what...it's actually pretty easy to make. Consider this a Sneak Peak, because you WILL see this popping up in one of my class offerings soon..I just can't wait to make more!

Alot of the items I have been showing use products from our Occasions Mini Catalog. If you don't have one and would like one...please let me know! Besides product, there is always TONS of project ideas too. While you're waiting for your paper copy in the mail, please take a look at the PDF version that is on the sidebar.  

Sunday, February 6, 2011

Coming off my creative high...

Yesterday was our Team's Stampfest...what a great day of inspiration and crafting to say the least! When we arrived we were greeted with a huge bag of goodies that we'd be working on all day plus this super cute name tag...

I am SO stealing this idea for my classes & workshops now!

Our first project of the day was to create this cute Button Bracelet...

We made this using the Simply Adorned Bracelet along with a sampling off all the Designer Buttons hooked on with jump rings. Once you get a hang of using the jewelry pliers, this turns into a fast little project!  I can definitely see myself making another one using all pink, white & clear buttons...and maybe throwing in a pink bauble or vanilla pearl! So cute! 

I always seem to gravitate to certain lines that Stampin' Up! carries and others I say "that's cute" but I move on through the catalog.  The Oh Sew Suite line from the Occasions Mini Catalog line was one of them...until now.  Check out this adorable display of items using this line...
Here are some close ups for you to check out:

This is actually the box that the Stampin Up! Designer Fabric comes in (I LOVE that they now carry fabric!). The box is wrapped using the Sweet Stitches decorative paper and the flower was created using the pieces to the Pattern Pieces stamp set cut out to form petals! The center is finished off with a Designer Big Button wrapped in Tangerine Tango pom pom trim and tied off with some twine. What a way to wrap up a gift for that crafter or quilter in your life...so use the fabric yourself and dress up the box for any other gift giving needs!  


Next is a really great idea for a scrapbook page, I don't know if you can tell...but the page itself is compromised of all flaps that can be lifted to view more pictures...love the layers!  If you're interested, I can send you a picture of the accordion topper..so you can see how it was put together.   Items like this make me want to become a scrapbooker! Again, this is created with the Sweet Stiches paper and buttons.


Here's a little button holder with a pincushion on top!

One of the more exciting times of the day is when we won prizes!! This is what I won (SO HAPPY!).
The heart was made using the Petal Cone Bigz L Die with the Big Shot. Can you tell what's inside? A sweet little pincushion using the Sweet Stitches fabric! That little "flag" that says Enjoy is actually a part of the die as well.

Wondering where all the cards are using this line?? Well, that I am saving for a MARCH CLASS! Stay Tuned! And be sure to subscribe to my blog so you can get updates and sneak peaks!


One last item to share for today...a flower bookmark made with the early espresso satin ribbon, the Fun Flowers Die and a Big Button that is tied off with a sweet little trinket key (more on these later!) Do you love this as much as I do? Great....because this is going to be one of the projects we'll do if you book a workshop with me in February. Contact me to get a schedule a date! raeannskerrett@hotmail.com.

I have TONS more to share with you....can you say VINTAGE? More pics and ideas to come!